Tuesday, January 25, 2011

spring preview

I'm excited to share some images of my latest pieces for my Spring collection. I've been obsessed with a new flower making technique that I've picked up, and here are the results; something amazingly romantic, feminine, soft, and just beautiful. I'm loving the subtle colors, wavy petals, and vintage millinery stamens. These pieces are made of a combination of muslin and crepe fabrics that have been stiffened, hand cut, shaped and assembled. It's a long process but completely worth it. Each bloom is attached to a wire hair comb and assembled with a gathering of coque feathers. It would be stunning slipped behind a loose, chignon, or tucked behind an ear.

Saturday, January 22, 2011

real bride: emily

I was very flattered when my friend Miranda contacted me to help her design a hair piece for her sister Emily, who had a late summer wedding in Thailand. I ended up creating a magnolia bloom with a peach Swarovski crystal center, framed by a cluster of white coque feathers. Here are some gorgeous images of Emily and the special people in her life. Congratulations to the happy couple!!

Photo credit: Alice Hu & Serena Choi of Lovely Leaf Studios

Thursday, November 11, 2010

bridesmaids accessories

Here are some photos of a few of the bridesmaids accessories that I made for Denise's wedding featured below. Each is unique and completely customizable to match any dress color. The sashes double as both a belt and headband, and can be worn with a ton of things like a cardigan for a casual look, or with a dress to add a dainty touch. The brooches double as a hair clip, and can be attached to anything from purses, to jackets, to headbands and more! These particular pieces were made from a combination of silk organza, taffeta, and tuille netting. I added guinea feathers for a rustic, organic look, and adorned the flowers with gemed centers and glass beads.

real bride: denise

Several months ago my childhood friend and makeup artist Michaela Yee asked me to create some wedding accessories for her boyfriend's sister's Fall nuptials. Without hesitation I happily agreed. Denise was such a lovely and easy bride to work with, entrusting Michaela with all her wedding decisions and design.

For the bride I created a dupioni silk gardenia flower fascinator accented with white goose feathers and a Swarovski pearl cluster center. This fascinator attached to a russian netting birdcage veil which was worn during the ceremony, and later removed for the reception. To adorn her neck I created a multi-strand pearl necklace joined by a vintage inspired jeweled clasp with a coordinating bracelet.


Since all the bridesmaids wore different dresses I created something a little different for each of the ladies but made sure to still retain the theme. Some wore their piece as a belt, or head band while others could wear their's as a brooch or hair clip. All wore pearl bracelets which matched the bride's.


Not only did Michaela plan and coordinate the wedding seamlessly, she also did the beautiful hair + makeup for the bride and the rest of the wedding party, not to mention her own as a bridesmaid as well! Impressive!!

Gorgeous photos taken by Lydia Chen Photography display how much thought and love went in to this wedding. Congratulations and best wishes to the beautiful bride and groom!

Wednesday, November 10, 2010

macaron madness

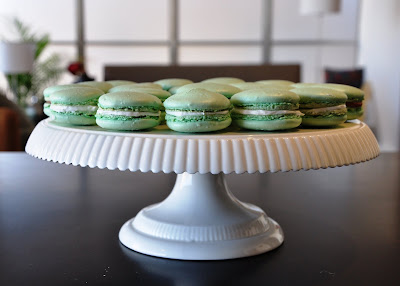
I have attempted to make french macarons way more times than I'd like to admit, and have been struggling with achieving success. So you can imagine my delight when a couple of friends invited me to take a macaron class with them. I was so proud of my macarons that I just had to share the end result!! Now, I just have to practice re-creating them...

french macarons with lemon buttercream, white chocolate pistachio, and chocolate ganache fillings.

Tuesday, June 1, 2010

doggie bag


Last week was my favorite nephew's 1st birthday. Kona is the silliest labradoodle ever with the sweetest personality. His favorite activities include cuddling, licking everything that comes near his mouth, and playing ALL the time! Being the spoiled pup that he is, I didn't want to buy him another toy or anymore snacks, so I decided to make a bag to tote around all his stuff. I found this great project on my idol martha's website.


This is a very simple project to do, and makes a lovely gift. I made mine a bit differently than how martha suggests, but either technique will work.

Supplies you will need:
  • canvas tote bag
  • fabric of your choice (size determined by size of desired image)
  • double sided interfacing/ paperbacked adhesive such as pellon's "wonder under"
  • iron
  • scissors
  • profile photo of your pet

Since my photo of Kona was a digital image, I went ahead and adjusted the contrast levels and size directly on my computer before printing. It helps to also grayscale your image, making the silhouette more clearly defined. If you don't have a photo editing program, you can always print your image, and resize and darken it on a copy machine. The size of the image is your choice. Take the paperbacked adhesive and iron it on to the back of your fabric, making sure to iron on the correct side (the fabric store will usually give you instructions along with your interfacing). Once the interfacing is completely adhered to your fabric you can tape or glue your printed image to the back. (Note: your final image will be the reverse of your original, so plan accordingly). Now just let your scissors do the work and cut away! After the silhouette is all cut out you can peel the paper backing of the adhesive and iron on the image to the to canvas bag. And... tadaa! You have a lovely, personalized tote bag.

Get creative and embellish. I added a bow to this tote, but you can use all sorts of ribbons and notions to make your bag unique. I hope you give it a try. No sewing required, I promise!

Tuesday, May 18, 2010

to each is own...

One person's junk is another person's treasure. The saying couldn't be more true.

Several weeks ago I made a trip to the navy base and headed to the Alameda Antique Fair. I was amazed by the endless rows of vendor booths and large crowds that followed. It was a gorgeous spring day with a clear view of the city. With an assortment of vintage textiles, jewelry, and accessories, I was lucky enough to bring home a lovely gemmed antique bracelet for $5! In addition, they have the most beautiful furniture ranging from french country, shabby chic to retro and georgian.

It is also a wonderful place when planning your own rustic chic wedding. With rows of colorful mason jars, boxes of vintage french lace, and a medley of dreamy milk glass vases, it's a DIY bride's dream come true!


The antique fair is a really great place to spend a Sunday morning. Some tips when visiting: leave after 9am as admission is only $5; go on a nice day, since there will usually be more vendors; wear comfortable walking shoes; and make sure you have plenty of time!


The fair is open on the first Sunday of every month. It's definitely worth checking out!